Processing Alvetex® Scaffold 3D Cultures for Cryosectioning
● Download this protocol as a PDF (3.5 MB)
1. Introduction
Tissue freezing and sectioning is a rapid method of generating tissue samples (cryosections) for histological analysis, and obviates the need for wax embedding. The method is popular for preparing samples for immunostaining since the need for antigen retrieval is also eliminated.
Alvetex Scaffold 3D cell cultures can be easily processed for cryosectioning. This document describes three separate methods and shows example data obtained from the culture and processing of HaCaT and HepG2 cells.
2. Materials and Methods
2.1. Materials Required for Fixing, Embedding and Sectioning
- OCT embedding matrix (Thermo Scientific, LAMB/OCT)
- 4 % Paraformaldehyde (PFA) fixative (For full method refer to Histology (1): Choosing the Right Fixative to Preserve 3D Cell Cultures.)
- Sucrose solutions (2 M, 15 % and 30 %)
- Liquid nitrogen
- Basic equipment: flat-ended forceps to handle 3D Alvetex Scaffold cultures scalpel (to trim/ cut scaffold if required); surgical scissors or single edge razor blade; disposable pipettes; embedding moulds; cryostat.
2.2. Materials Required for Histology and Immunocytochemistry
- 4 % Paraformaldehyde (PFA) fixative (For full method refer to Histology (1): Choosing the Right Fixative to Preserve 3D Cell Cultures.)
- Dehydration ethanols (70 % and 95 %)
- Histoclear
- Mayers Haematoxylin solution
- Eosin Y solution (2 g eosin Y in 1000 mL 95 % alcohol)
- Alkaline alcohol
- DPX mountant
- Blocking buffer (5 % Normal goat serum; 1 % bovine serum albumin; 0.2 % w/v Triton X-100 in PBS)
- Permeabilisation solution (1 % w/v Triton X-100 in PBS)
- Primary and secondary antibodies (specific to experimental analysis)
- Humidified chamber
- Vectashield/ DAPI mountant
2.3. Freezing
- Aspirate culture medium and carefully wash the 3D culture in PBS twice.
- If using well inserts, remove inserts from cradle and place in a conventional 6-well plate.
- Bisect the membrane using surgical scissors or a single edge razor blade.
- At this point one of the following three techniques can be chosen depending upon personal preference and experience:
2.3.1. Method 1: Samples can be frozen directly
- Transfer scaffold halves from each disc into a separate plastic embedding mould containing OCT mounting medium, flat side down and orientated longitudinal to the plane of sectioning. Allow the sample to soak for a few minutes at room temperature.
- Place a metal rack inside a Styrofoam box and fill with liquid nitrogen to a level just below the top of the rack. Place the embedding moulds on top of the rack ensuring that the scaffold pieces remain in an upright position. Let the sample freeze gradually for 10 minutes.
- Store at –80 °C.
2.3.2. Method 2: Samples can be soaked in sucrose before freezing to remove excess water (more suitable for cells in collagen gels)
- Transfer the scaffold to 2 M sucrose and store overnight at 4 °C.
- Transfer the scaffold to plastic embedding moulds containing OCT mounting medium and orientate into the required embedding position, as described in Method 1. Allow the sample to soak for a few minutes at room temperature.
- Place a metal rack inside a Styrofoam box and fill with liquid nitrogen to a level just below the top of the rack. Place the embedding moulds on top of the rack ensuring that the scaffold pieces remain in an upright position. Let the sample freeze gradually for 10 minutes.
- Store at –80 °C.
2.3.3. Method 3: Samples can be fixed before freezing
- Transfer the scaffold to 4 % PFA and store overnight at 4 °C.
- Remove the excess water gradually in two baths of sucrose, 15 % followed by 30 % (overnight at 4 °C in each bath).
- Transfer the scaffold to plastic embedding moulds containing OCT mounting medium and orientate as described in Method 1. Allow the sample to soak for a few minutes at room temperature.
- Place a metal rack inside a Styrofoam box and fill with liquid nitrogen to a level just below the top of the rack. Place the embedding moulds on top of the rack ensuring that the scaffold pieces remain in an upright position. Let the sample freeze gradually for 10 minutes.
- Store at –80 °C.
2.4. Sectioning
- At least twenty-four hours after freezing, the samples are ready for sectioning on a suitable cryostat (e.g. Leica CM1850).
- Let the sample sit in the cryostat for 20-30 minutes before sectioning to allow the sample to adjust to the temperature.
- Following the cryostat manufacturers’ instructions throughout, align the block correctly with the cryostat blade and proceed to cut 5-10 μm sections.
- Transfer sections to microscope slides. Histobond slides are recommended since sections adhere to these slides well.
- Let the sections dry for at least 2 hours before processing. The sections should now be ready for histological and/or immunocytochemical analysis.
2.5. Analysis
Figure 1. (see below) shows examples of frozen 3D Alvetex Scaffold cultures, cryosectioned and stained with Haematoxylin and Eosin.
2.5.1. Histological analysis
Set up a series of slide baths and process sample slides using slide holders in the following sequence of solutions, for the times indicated:
| 1. | Rehydrate section in PBS. | 10 minutes |
| 2. | Fix section in 4 % PFA at 4°C | 15 minutes |
| 3. | Wash in PBS. Repeat × 3 | 5 minutes |
| 4. | Wash in distilled water | 1 minute |
| 5. | Stain in Mayers Haematoxylin | 5 minutes |
| 6. | Wash in Distilled water | 30 seconds |
| 7. | Blue the nuclei in Alkaline alcohol | 30 seconds |
| 8. | Dehydrate in 70 % alcohol | 30 seconds |
| 9. | 95 % alcohol | 30 seconds |
| 10. | Stain in Eosin | 1 minute |
| 11. | Dehydrate in 95 % alcohol | 10 seconds |
| 12. | 95 % alcohol | 10 seconds |
| 13. | Absolute alcohol | 15 seconds |
| 14. | Absolute alcohol | 30 seconds |
| 15. | Clear in Histoclear | 3 minutes |
| 16. | Histoclear | 3 minutes |
| 17. | Slides remain in Histoclear until ready to coverslip to prevent drying out. | |
| 18. |
Mount slides by spotting DPX solution around the section and cover with a coverslip. Allow to air dry for at least one hour. |
|
2.5.2. Immunocytochemical Analysis
- Rehydrate sections for 10 minutes in PBS.
- Fix for 15 minutes in 4 % PFA at 4°C.
- Wash in PBS for 5 minutes. Repeat PBS wash three times.
- Treat cells with permeabilisation solution for 15 minutes at room temperature.
- Aspirate permeabilisation solution, replace with blocking buffer and incubate for 15 minutes at room temperature.
- Incubate with primary antibody diluted in blocking buffer (this will be specific to the antigen chosen and will be used at a pre-determined concentration) overnight at 4 °C in a humidified chamber, or as stated in the datasheet for the specific antibody used.
- Wash three times in PBS for 10 minutes each.
- Incubate with secondary antibody diluted in blocking buffer (this will be specific to the antigen chosen and will be used at a pre-determined concentration) for 2 hours in the dark at room temperature.
- Wash three times in PBS for 10 minutes each.
- Mount in Vectashield/ DAPI and place a coverslip onto the mountant. This solution simultaneously mounts the specimen and stains cell nuclei.
- Seal the perimeter of the coverslip with nail varnish and dry in the dark. Store slides in the dark at 4 °C until ready for inspection using a fluorescence microscope equipped with the appropriate filters.
Figure 2. shows examples of a 3D Alvetex Scaffold culture cryosectioned and stained for immunofluorescence.
3. Example Data
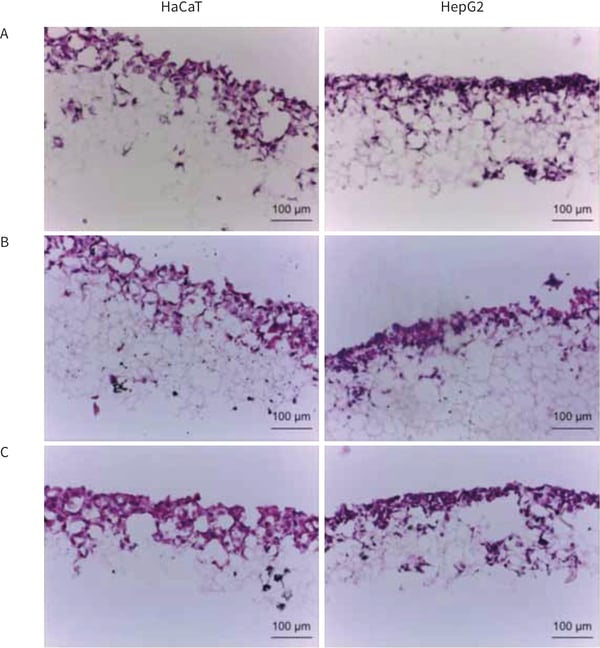
Figure 1. Haematoxylin and Eosin staining of Alvetex Scaffold cultures of HaCaT and HepG2 cells after cryosectioning and PFA fixation. Three different protocols have been used to freeze the samples; samples have been frozen directly (Method 1, A), soaked in sucrose before freezing (Method 2, B) or fixed before freezing (Method 3, C). For all protocols used the integrity of the scaffold is maintained.
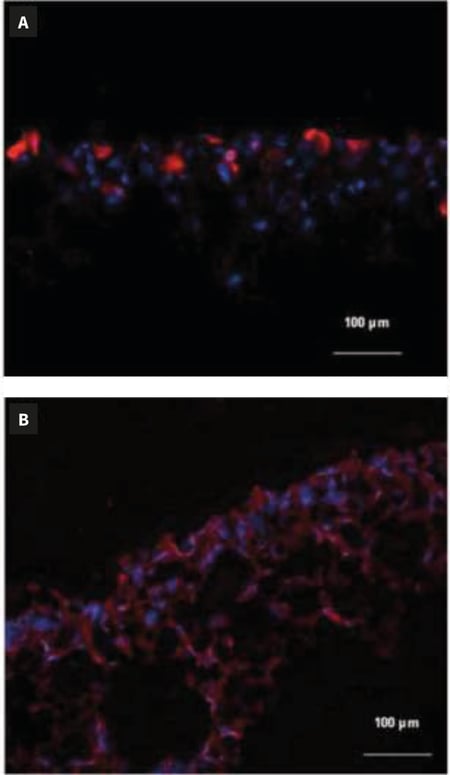
Figure 2. Immunocytochemical staining of cryosectioned Alvetex Scaffold 3D cell cultures. Scaffolds were directly frozen after culture, according to Method 1. HaCaT cells have been stained with an anti-keratin-10 antibody in red (A) and HepG2 cells have been stained with an anti-keratin 8 antibody in red (B). Nuclei have been counterstained in blue using a DAPI marker.