Example Protocol using Alvetex Scaffold 6 Well Inserts for 3D Perfused Cell Culture (Alvetex Perfusion Plate)
● Download this protocol as a PDF (3.7 MB)
The following protocol is an example that applies to the set-up of a re-circulating circuit using a single Alvetex Perfusion Plate (AVP011) in conjunction with Alvetex 6 well inserts (AVP004).
1. Materials required
| Item | Supplier | Product Code |
|---|---|---|
| Alvetex Perfusion Plate | REPROCELL | AVP011-2; AVP011-10 |
| Multichannel cassette pump 205S/CA | Watson Marlow | 020.3704.00A |
| Silicon tubing (Media IN) (see figure 2B) |
Sigma | T1664-25FT (1.6 mm ID) |
| Silicon tubing (Media OUT) (see figure 2B) |
Sigma |
T1914-25FT (2.4 mm ID) |
| 0.22 mm sterile filter | Millipore | SLGP033RS |
| Reservoir bottle | Nunc | Various sizes available |
| Tube connectors (1.6 mm) – optional | Value Plastics | AA-J1A 1.6 mm |
| Tube connectors (2.4 mm) – optional | Value Plastics | DD-1 2.4 mm |
| Empty 1 ml pipette tip box – optional | e.g. Starlab | — |
2. Seeding of cells onto Alvetex 6-well inserts
- Prepare cells and seed onto Alvetex 6 well inserts in preparation for 3D cell culture. Follow guidance as provided in the Alvetex Scaffold Quick Start protocol.
- Maintain growth of cells until ready for transfer into the perfusion plate.
3. Sterilising the perfusion system
- Alvetex perfusion plates are supplied blister packed and sterile.
- Ensure tubing and reservoir bottles are sterile and ready for use in cell culture.
- If necessary, components can be rendered ‘sterile’ by immersion in 70 % ethanol solution followed by rinsing in sterile dH2O. Autoclaving can be used if materials are compatible with this sterilisation process.
- Operate within a sterile microbiological laminar flow cabinet when constructing the circuit for perfusion and arranging the necessary components.
4. Perfusion set-up with Alvetex 6 well inserts
- Place 130 mL of culture media into the reservoir bottle.
- Using the Watson Marlow 205S/CA peristaltic pump, circulate the medium in the appropriate direction around the circuit (see Figures 1 and 2). Initially this can be done at a high flow rate to fill the system. When cells are cultured within the plate, slower flow rates are recommended (e.g. 200 μL per minute).
Note: flow rate settings need to be optimised in relation to pump type and model, and requirements of the experiment.
- Wait for the culture medium to fill up the system and circulate (evident by media dripping back into the media bottle). Approximately 30 mL of medium is required to fill this particular circuit and plate, leaving 100 mL in the reservoir bottle. The medium volume should remain at this level throughout the culture period. Run the perfusion system for 5 minutes and check for leaks.
- Carefully transfer the Alvetex 6-well inserts (prepared above) into the wells of the Alvetex Perfusion Plate.
- Transfer the entire perfusion circuit and apparatus into the incubator, remembering to press start on the pump key-pad to initiate medium flow. Ensure that the power cable for the pump is already fed into the back of the incubator and that the incubator inlet hole (where the cable enters) is covered as much as possible with the rubber bung/ insulation. A spare power cable is recommended to allow transfer of operation between the incubator and laminar flow hood.
- Run the experiment for the desired period, changing 50 % of the media volume every 7 days.

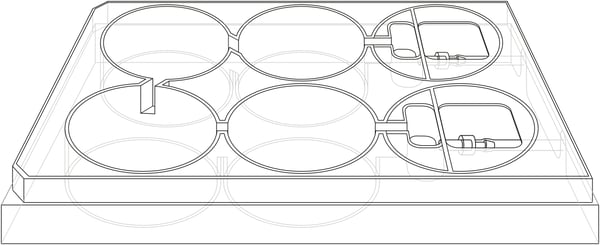
Figure 1. Schematic diagram showing overall plan and layout of the Alvetex Perfusion Plate (AVP011).

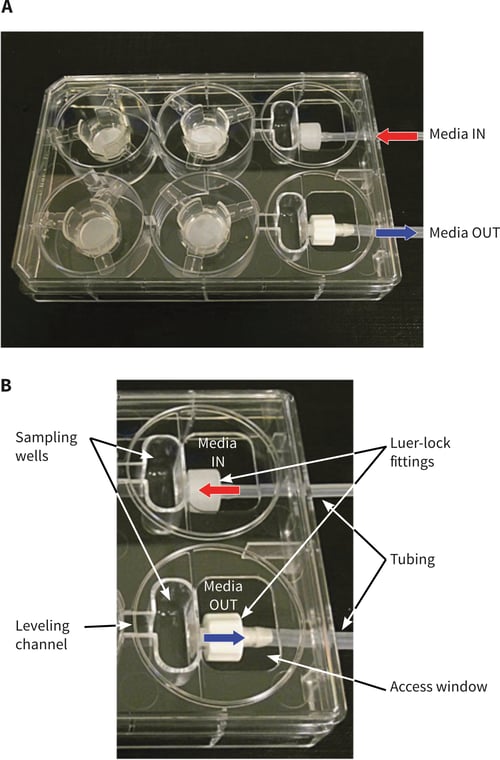
Figure 2. Design of the Alvetex perfusion plate. (A.) Perfusion Plate with lid containing four Alvetex well inserts, Luer-lock fittings and attached tubing. (B.) Showing the sampling wells, media levelling channel, Luer-lock fittings, access window, and attached tubing. Note labelling of Media IN (1.6 mm tube) and Media OUT (2.4 mm tube), indicating unidirectional flow around the plate.
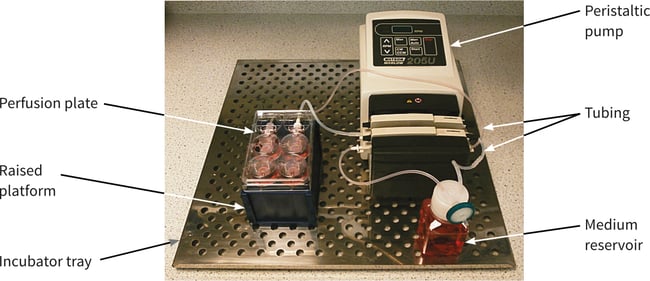
Figure 3 shows a photograph of the example method including the Perfusion Plate, pump, tubing and medium reservoir set-up on a stainless steel tray that slides into the cell culture incubator.

Figure 3. Typical arrangement for the set-up of the Alvetex Perfusion Plate, tubing circuit, peristaltic pump and medium reservoir. Note that the plate is raised by about 5 cm (positioned on the top of an empty pipette tip box).

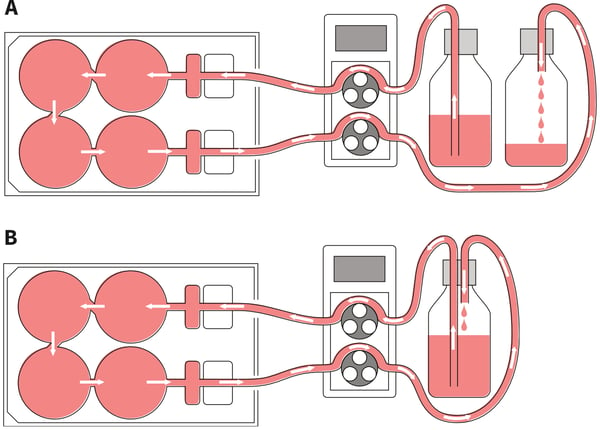
Figure 4. Setting up different circuits for medium perfusion. (A.) Non-circulating set-up: The Perfusion Plate can be arranged such that cells receive a continual supply of fresh culture medium. In this case the fresh medium from the reservoir is pumped around the circuit before being collected in a waste bottle. (B.) Circulating set-up: The same culture media pumped from the reservoir is continually circulated and returned through the plate repeatedly. This set-up is useful for generating conditioned media and concentrating factors released from the cell culture.