Alvetex Scaffold Whitepaper 02
Hints and Tips for Successful Confocal Microscopy of 3D Cell Cultures using Alvetex Scaffold
Download this whitepaper as a PDF (6.45 MB)
Overview
Alvetex Scaffold technology represents a novel tool for the scientist working in the cell culture field by offering an opportunity for major advancements in cellular organisation over traditional 2D cultures. Because cells in Alvetex Scaffold form tissue-like structures, sophisticated techniques traditionally reserved for the analysis of tissues become more appropriate.
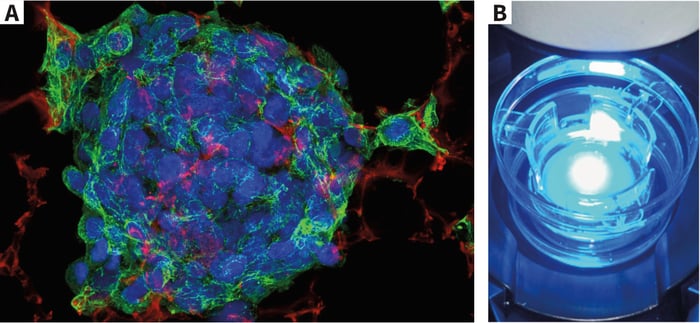
Above: (A) Triple fluorescent staining of hepatocarcinoma HepG2 cells grown for 3 days on Alvetex Scaffold. (B) Example live cell imaging set-up.
1. Principles of Confocal Microscopy
Conventional wide-field microscopy relies on the flooding of samples with light and direct viewing by eye. As no light is excluded from the eye-piece, significant ‘flaring’ and light scatter can occur from out-of-focus regions within the sample. This reduces the apparent maximal resolution capacity of the microscope and the quality of the image obtained.
The main advantage of using confocal microscopy is the ability to eliminate out-of-focus flaring, which greatly improves image resolution. This is achieved by the incoming light being focused through the objective lens onto a point in the sample, which reduces the area of excitation, and the reflected light being passed through a pinhole before entering the light detector, which eliminates any remaining out-of-focus light. This signal acquisition method requires sequential scanning over the whole sample followed by software processing to build a digital image.
Other advantages of confocal microscopy over conventional microscopy include the production of optical sections as a vertical 3D stack and the ability to increase magnification without having to change stage objectives.
2. Overview of Alvetex Imaging
Alvetex Scaffold is a cross-linked polystyrene scaffold with a void-like structure, with voids having an average diameter of 40 μm with interconnects of approximately 13 μm in diameter. When supplied as discs 200 μm thick, the combined thickness and density of Alvetex Scaffold makes it ideal for cell multilayering in vitro, but also renders the substrate opaque to the naked eye. This, however, does not prevent the visualisation of the cells growing in Alvetex Scaffold using commonly-available staining and microscopy techniques (see Table 1). A range of detailed cell visualisation protocols are available online at protocols.
| Visualisation Technique | Staining Agents | Sample Presentation | Example Application |
| Naked Eye | Dyes (eg. Neutral Red, Methylene, Blue, MTT reagent, Bouin’s™ Fixative) |
|
|
| Light Microscopy | Dyes and histological techniques (eg. Neutral Red, Haematoxylin & Eosin) |
|
|
| Conventional Fluorescent Microscopy | Fluorescent Dyes and Antibodies |
|
|
| Confocal Fluorescent Microscopy | Fluorescent Dyes and Antibodies |
|
|
| Scanning Electron Microscopy | Secondary Electrons |
|
|
| Transmission Electron Microscopy | Transmitted Electrons |
|
|
Table 1. Imaging Techniques compatible with Alvetex Scaffold. For detailed protocols, see protocols. ‘Wholemount’ refers to cells cultured in Alvetex Scaffold and processed without embedding and sectioning, i.e. Alvetex discs removed from their plate or insert, then directly washed, fixed, stained and imaged. By definition, live cell imaging also relies on imaging of whole-mounted discs.
3. Sample Preparation for Confocal Microscopy
When conventional 2D samples are processed for fluorescent confocal imaging, the exact protocol to be followed will vary according to the overall aim of the experiment and the antibody or dye used. When Alvetex Scaffold 3D samples are processed, these factors must also be respected, as well as some additional considerations due to the nature of the 3D substrate.
Below are a number of choices to be made in the early protocol stages to tailor the preparation of the sample to its final application.
| Transverse Sections | Transverse Sections | Wholemount |
| Advantages |
|
|
| Disadvantages |
|
|
| Example Application |
|
|
Table 2. Characteristics of Alvetex Scaffold sections vs wholemounts. For detailed protocols, see protocols.
3.1. Section or Wholemount?
The decision to section the sample or keep it intact and whole should be consistent with the general aim of the experiment.
If using sections, we recommend the use of SuperFrost Plus microscope slides (Thermo Scientific) for good cell adherence and minimal sample loss during processing.
If using wholemounts, discs can be washed by floating them in individual wells of a 6-well plate. For staining, wholemounts can be laid onto glass coverslips of the appropriate size (i.e. at least 22 mm diameter for 12-well plate and 6-well insert formats; and at least 15 mm diameter for 24-well plate and 12-well insert formats) and then transferred onto parafilm, with the wholemount on top and the glass coverslip in between the wholemount and the parafilm. When adding the antibody solution, the combination of glass and parafilm will prevent the antibody solution from spilling away from the sample. Advice on how to mount a wholemount for imaging is given in Section 5.1. below.
3.2. Which Fixative?
‘Fixation’ is a process of stabilization important for anatomical study of any biological tissue. To achieve this, decomposition caused by tissue enzymes and decay must be arrested. During the process tissue is hardened for convenient handling. Mechanisms of action during fixation are poorly understood, but generally involve denaturation of protein. Survival of tissue antigens for immunochemical staining depends on the type and concentration of fixative, on fixation time, and on the size of the tissue specimen to be fixed. Given that the 3D cell culture is relatively thin, fixation of cells is rapid and efficient. From a single 3D culture experiment, it is also possible to cut the disc into pieces using a scalpel and process them in alternative ways as required for different downstream staining methods.
Examples of fixatives used to process 3D cell cultures:
- Bouins – excellent fixative for use when samples are to be paraffin embedded, sectioned and stained for general histology, especially for the trichrome stains. Bouins is poor for immuno-detection.
- PFA (4% paraformaldehyde) – fixative for paraffin embedding and sectioning. These samples can be stained for general histology but the degree of fixation is less vigorous than Bouins so the quality of the morphology is not quite as good. This fixative does allow for subsequent immuno-detection of certain antigens and should be used therefore when the objective is to study morphology and protein expression simultaneously.
- Karnovsky’s – this is a mixture of para-formaldehyde and glutaraldehyde, with post fixation in osmium tetroxide, and is suitable for use when preparing samples for electron microscopy.
Depending on which cellular compartment is to be stained, alternative methods of fixation for immunofluorescence can be advantageous (e.g. ice-cold methanol for microtubule staining).
Generally, the fixative to be used for 3D cultures should be determined by the nature of the antibody used and by its target rather than by the fact that the cultures are in 3D. A notable exception is acetone, which produces moderate swelling of Alvetex Scaffold and should therefore be avoided. (See figure 1 legend.)
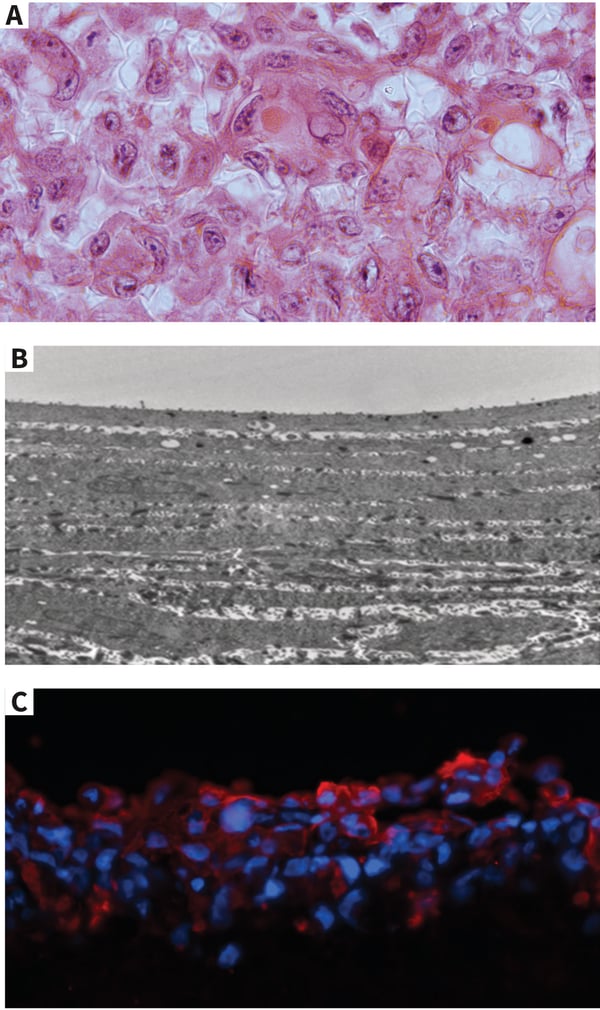
Figure 1. Representative pictures of sectioned keratinocytes cultures grown in Alvetex Scaffold. Micrographs illustrate a range of imaging techniques using sections embedded with wax (A: H&E staining of keratinocyte stem cells), resin (B: TEM of stratified keratinocytes), or cryopreservant (C: immunohistochemistry of keratin 10 in keratinocytes).
3.3. Which Embedding Method?
Wax embedding, resin embedding and cryopreservation are all compatible with Alvetex Scaffold and will result in the immobilisation of cell cultures prior to sectioning. Each method requires different equipment setups and can affect downstream processing steps, e.g. antigen retrieval. If embedding is incompatible with the target antigen, the option of staining the sample as a wholemount should be considered.
| Wax Embedding | Resin Embedding | Cryopreservation |
|
| Advantages |
|
|
|
| Potential Disadvantages |
|
|
|
Table 3: Characteristics of embedding methods. For detailed protocols, see protocols.
3.4 Live Cell Imaging
Imaging of live cells allows migrating cells to be monitored during wound healing or substrate invasion/migration in vitro, and can help determine the fate of specific cell populations during organ development in vivo. By providing a porous 3D scaffold through which individual cells can navigate for extended periods of time and where confluent cell populations routinely multilayer, Alvetex Scaffold offers a step-up from both the traditional 2D scratch and trans-membrane assays.
By default, live cell imaging is done in whole-mounts and requires no specific processing other than staining, which most often takes the form of a fluorescent reporter carried by the cells.
4. Staining
Immunofluorescent staining of cells cultured in Alvetex Scaffold follows the same general considerations as staining of cells cultured in 2D, i.e. each protocol used should be primarily optimised to the target antigen and the antibody used, with only a few modifications required to account for the nature of the substrate.
Substrate-specific modifications are:
- Requirement of antigen retrieval for wax-embedded samples, due to extensive fixation prior to embedding.
- Thorough blocking and washing steps to reduce non-specific binding of antibodies to Alvetex Scaffold.
- Avoidance of hydrophobic dyes. Such dyes show high binding affinity to Alvetex Scaffold and will result in significant background.
Recommended uses for, and alternatives to, hydrophobic dyes with Alvetex Scaffold are detailed in Section 4.3 below.
4.1 Alvetex Protocols available online from REPROCELL
Detailed protocols are available to download from protocols. These cover every step of sample processing for immunofluorescence, as well as other cell visualisation techniques. Topics covered include:
- Light microscopy
- Fluorescent confocal live cell imaging
- Fixatives
- Wax embedding
- Resin embedding
- Cryopreservation
- Histological staining
- Immunohistochemical staining
- Fluorescent confocal microscopy
- Scanning electron microscopy
4.2 Examples of Tried and Tested Dyes and Antibodies
A large number of dyes and antibodies have been successfully used in Alvetex Scaffold to target a range of intracellular structures. Table 4 shows a non-exhaustive list of such dyes and antibodies. Example images for some of these are also shown in the last section of this document.
| Dye/Antigen | Cell Compartment | Sample Presentation | Supplier Information |
| Beta-3-Tubulin | Cytoskeleton | Wax-embedded section | Covance clone TUJ1 |
| CellTrackerTM CM-DiI | Membrane | Live cell | Invitrogen |
| Cytokeratin 8 | Cytoskeleton | Wholemount | Sigma clone M20 |
| Cytokeratin 10 | Cytoskeleton | Cryo/Wax-embedded section |
Abcam clone DE-K10 |
| GFP | Cytoplasm | Live cell and whole- mount |
Mirus |
| Hoechst 33342 | Nucleus | Wax-embedded section | Molecular Probes |
| Involucrin | Cytoplasm | Wax-embedded section | Abcam clone SY5 |
| Ki67 | Nucleus | Wax-embedded section | Abcam polyclonal ab1 5580 |
| Occludin | Membrane | Wholemount | Invitrogen clone OC-3F10 |
| P-glycoprotein | Membrane | Wax-embedded section | Abcam clone JSB-1 |
| Actin-stain Phalloidin | Cytoskeleton | Wholemount | Cytoskeleton, Inc. |
Table 4: Examples of dyes and antibodies that have been successfully used to stain cells grown in Alvetex Scaffold.
4.3 Incompatible Dyes
Alvetex Scaffold’s inherent hydrophobicity is easily overcome with 70% ethanol treatment for wettability prior to cell culture, but it also results in significant binding of any hydrophobic compound, including certain fluorophores. This can provide a convenient way of visualising the scaffold, e.g. with Nile Red, but also generally means that hydrophobic dyes are not recommended to stain intracellular structures in Alvetex Scaffold cultures. Alternatives for fixed cells are available for most applications, e.g. Quantum Dots (Molecular Probes, Life Technologies). If necessary, hydrophobic dyes can be used by staining live cells in suspension prior to seeding in Alvetex Scaffold, although this restricts the time scale of any subsequent experiment.
Note that when staining the scaffold with Nile Red a signal is produced in both the red and green wavelengths and that exposure to the dye must be kept very short (i.e. 5 min maximum) to minimise green fluorescence.
5. Imaging
5.1 Sample Mounting
Mounting sections of cells cultured on Alvetex Scaffold is similar to mounting tissue sections, i.e. the samples are already adhered to a microscope slide and require the addition of mounting medium (e.g. Vectashield or CitiFluor), the placing of a glass coverslip and the sealing of the coverslip to the slide.
Mounting wholemounts is essentially similar to mounting of cells grown on glass coverslips, i.e. the addition of a small drop of mounting medium to a microscope slide, the placing of the Alvetex Scaffold disc onto the slide, the addition of another small drop of mounting medium, the placing of a glass coverlsip and the sealing of the coverlsip to the slide. To facilitate imaging of both top and bottom surfaces of the culture, Alvetex Scaffold discs can be cut in two halves prior to positioning onto the microscope slide, with one half being turned over.
For advice on washing and exposing whole-mounts to antibodies, see Section 3.1 above.

Figure 2: Absence of Alvetex Scaffold autofluorescence. Hoechst33342-stained HepG2 cells grown in Nile Red stained Alvetex Scaffold are easily imaged on a LEICA SP5 confocal microscope, with overexposure being evident at a high gain setting (A: Hoechst detection: excitation 405nm, emission bandwidth 430nm-550nm; C: Nile Red detection: excitation 488nm, emission bandwidth 500nm-650nm). At the same gain setting, an empty and unstained Alvetex Scaffold yields no signal (B: unstained scaffold without cells: excitation 405nm, emission bandwidth 430nm-550nm; D: unstained scaffold without cells: excitation 488nm, emission bandwidth 500nm-650nm). Scale bars: 100 μm.
5.2 Autofluorescence
Autofluorescence results from the excitation of endogenous fluorophores within a sample, resulting in higher background and/or false-positive signal. Autofluorescence can easily be produced by overexposing a sample to a high laser power or for an excessive period of time and it is therefore important to know and respect the laser and exposure settings used with each microscope. Autofluorescence can also be confused with non-specific binding of secondary antibodies. Non-specific binding can be kept minimal by rigorous blocking and washing steps during sample staining.
If imaging is performed with attention to these guidelines, i.e. appropriate laser/time settings and thorough blocking and washing, Alvetex Scaffold will not autofluoresce. When trying to image a wholemount with a conventional microscope, light diffraction through the thickness of Alvetex Scaffold can produce substantial background signal and we therefore recommend to always use confocal microscopy for imaging wholemounts.
5.3 Depth Imaging
Alvetex Scaffold is supplied at a thickness of 200 μm, which might exceed the Z-stack capacity of some models of confocal microscopes. The exact depth of sample that can be successfully imaged will vary according to the density of the cell culture and the fluorophore used, so that depths of between 50 and 100 μm can be achieved from a cell-seeded Alvetex Scaffold disc. As high-density 3D cell cultures approximate the complexity and structure of in vivo tissues, fluorophores specifically developed for in vivo deep imaging, e.g. mCherry (Clontech), can be used to improve performance if needed.
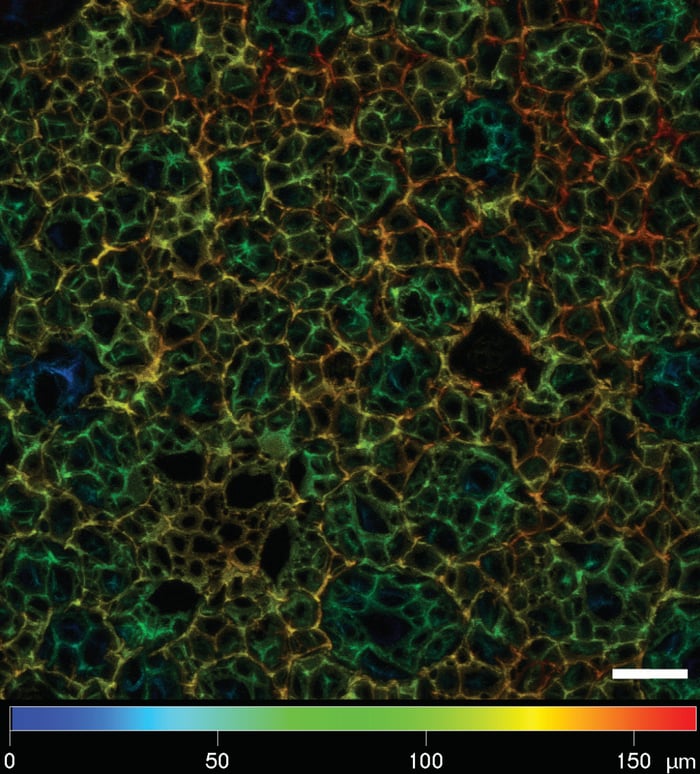
Figure 3: Depth color-coded Z-stack of cell-free Alvetex stained with Nile Red. Picture taken on a Zeiss LSM 510 confocal micro-scope. Note the depth of the Z-stack exceeds 150 μm. Scale bar: 50 μm.
5.4 Live Cell Imaging
Successful live cell imaging requires the careful optimisation of experimental conditions and microscope set-ups. In addition to following manufacturer’s instructions, below are a few examples of simple parameters that can greatly affect the quality of the results obtained.
These are even more important for long exposures, i.e. overnight to several days. For research use only. Not for use in diagnostic procedures.
- Stage inserts designed to maintain the cell culture plate at a temperature of 37°C require overnight equilibration to allow for the expansion of the metal frame. Insufficient equilibration times will not result in full expansion of the frame and lead to a continuous loss of focus until equilibrium is reached, i.e. up to several hours.
- CO2 supply designed to maintain a suitable pH within the cultures requires a few hours run-time prior to introduction of the cultures to the containment cage. In cases when the CO2 supply is absent or unstable, HEPES-buffered cell culture media can be used.
- Repeated and/or long-term exposure of dyes and live cells to fluorescent light can lead to photobleaching and light toxicity, respectively. These problems can be reduced by optimising laser settings and making sure that shutters are closed in between acquisitions.
Correct focus will only be achieved within the working range of the objective, therefore if using Alvetex Scaffold in an insert format, it might be necessary to lift the insert from its holder and to place it at the bottom of a Petri dish filled with the appropriate cell culture medium. We recommend the use of 35 mm cell culture dishes, either plastic (Nunc) or glass-bottomed (Greiner Bio-one) to help achieve focus within the objective’s working distance. The culture can be returned to its original holder afterwards if applicable.
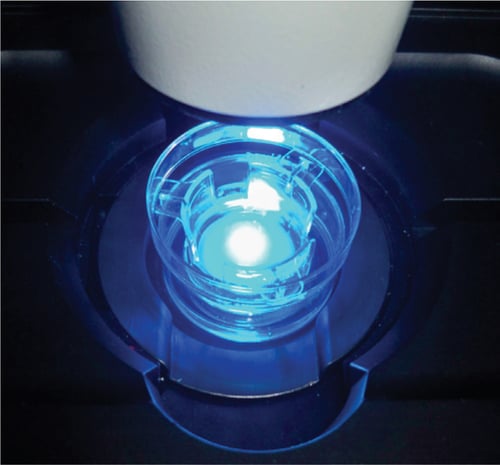
Figure 4: Example live cell imaging set-up. CHO-K1 cultures grown in 6-well inserts were transferred to a 35mm plastic cell culture dish (Nunc) and placed on a heated stage insert fitted to a ZEISS LSM 510 confocal microscope with live cell imaging capability. The culture was maintained in HEPES-buffered F-10 medium during imaging.
5.5. Sample Analysis and Processing
Confocal microscopy allows sequential imaging at different heights throughout the sample to produce single sharp pictures. Sequential depth imaging can also be applied as a semiquantitative tool to assess downwards cell migration into a substrate and, with the appropriate analysis software, can generate side views, 360 rotations and animations. This 3D reconstruction cannot be afforded by conventional microscopy and can be greatly informative, e.g. for studies of cell shape or to get sectional views of a whole-mount.

Figure 5: Imaging migration of cells in 3D culture using confocal microscopy. Migration of H1299 human non-small cell lung carcinoma cells in the presence or absence of mutant p53 protein. Cells were imaged from the top surface of the Alvetex Scaffold after 7 days migration. Serial confocal images of migrating control (top) and mutant (bottom) p53 cells taken at 10 μm intervals as the cells moved through the Alvetex Scaffold. From these images it is clear that migration is enhanced in mutant p53 expressing cells. Scale bar: 250 μm. (Data courtesy of Dr P.A.J.Muller, The Beatson Institute for Cancer Research, Glasgow).
Most confocal microscopes will supply their own proprietary software, e.g. Zeiss’ LSM image browser or Leica’s LAS AF Lite. Additional image processing software is also available from either commercial, e.g. Volocity, or free-to-download, e.g. BioimageXD, sources. All software will yield rewarding results once time and effort has been spent familiarising oneself with the user manual.
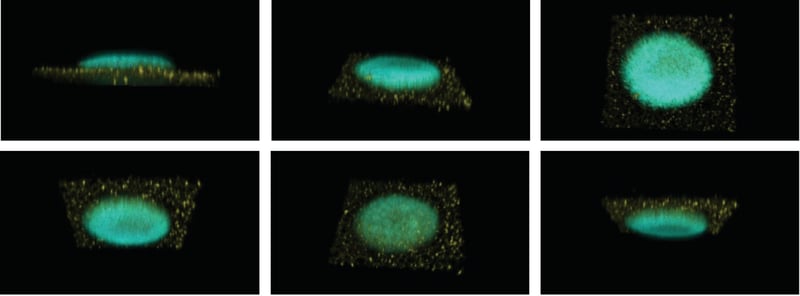
Figure 6: 3D animation using confocal images. Z-stack images of a DAPI-stained neurosphere grown and differentiated on top of Nile Red-stained Alvetex Scaffold were acquired using a ZEISS LSM 510 confocal microscope and processed using BioImage XD to produce an animated imaging of the neurosphere (~500 μm in diameter) following a user-defined path. Selected stills from the animation are shown, Alvetex Scaffold is false-coloured in yellow to increase visibility.
6. Examples
Below are examples of cell cultures in Alvetex Scaffold which have been stained for immunofluorescence and imaged with confocal microscopy. These show that intra-cellular structures can be successfully stained without substrate autofluorescence or non-specific binding.
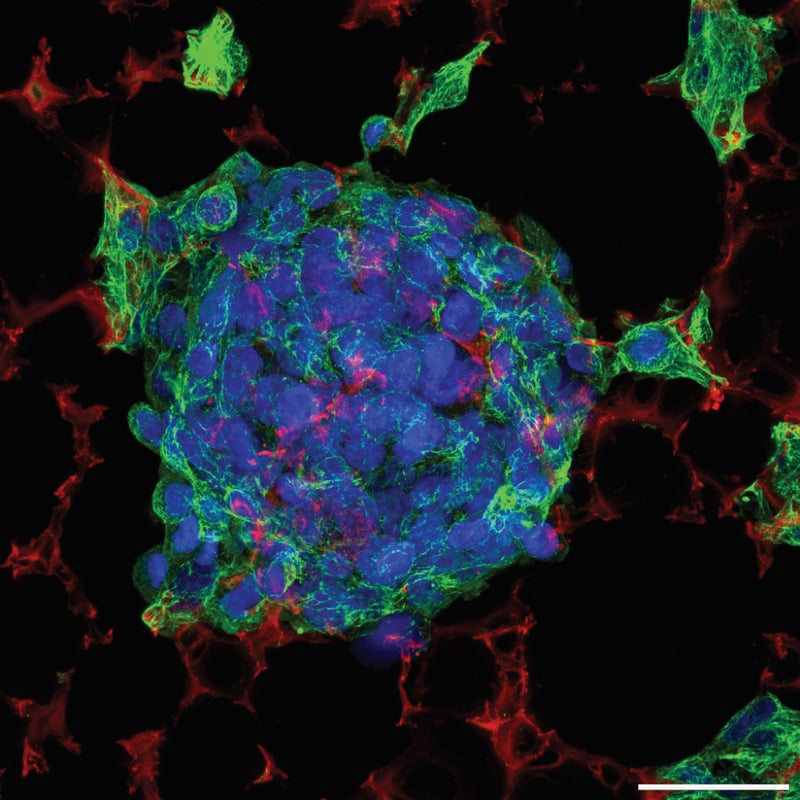
| Microscope | Zeiss 510 META |
| Objective | Plan-NeoFluor 40×/1.3 Oil |
| Wavelengths | 405 nm, 488 nm, 543 nm |
| Filters | BP 420-480, BP 505-550, BP 560-615 |
| Stack size | 230.3 Nm × 28.5 Nm |
| Cell type | HepG2 |
| Staining | Green: Primary antibody: mouse anti-cytokeratin 8, clone M20 (Sigma, C5301) applied 1 in 200 dilution for one hour at RT. Secondary antibody: AlexaFluor 488 goat anti-mouse IgG (Invitrogen, A11001) applied 1 in 600 dilution for one hour at RT. Red: Nile Red (Sigma, N3013) applied 1 in 1000 of a 1 mg/mL working solution for 10 minutes at RT after the secondary antibody. Blue: Hoechst 33342 (Molecular Probes, H-3570) was applied 1/1000 at the same time as the secondary antibody. |
Figure 7 (above): Triple fluorescent staining in Alvetex Scaffold. Cytokeratin 8 staining of 3 days old HepG2 cells grown on Alvetex Scaffold. Whole cultures were fixed in PFA and processed for immunofluorescent confocal microscopy without sectioning. Scale bar: 40 μm.
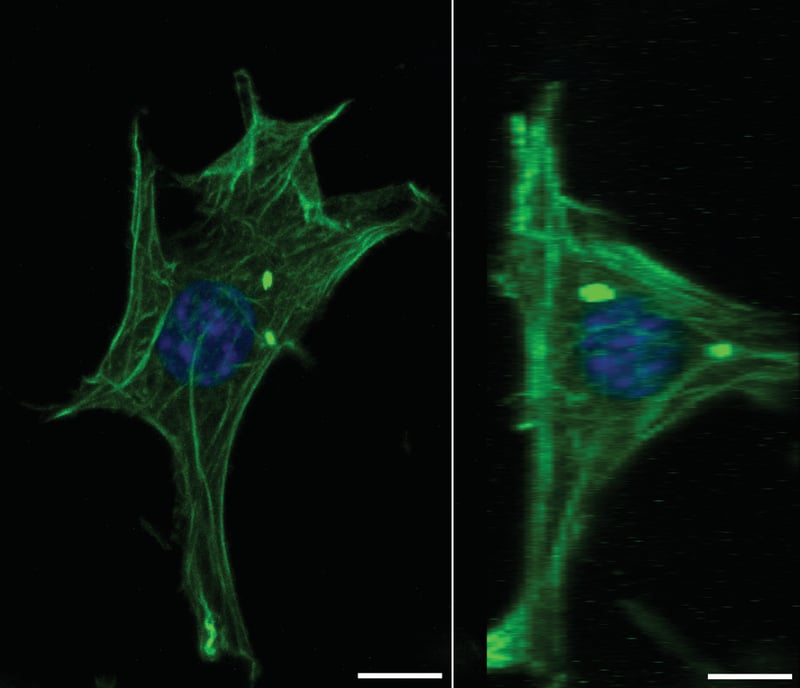
| Microscope | Zeiss 510 META |
| Objective | Plan-NeoFluor 40×/1.3 Oil |
| Wavelengths | 405 nm, 488 nm |
| Filters | BP 420-480, BP 505-550 |
| Stack size | 104.7 Nm × 104.7 Nm × 36.8 Nm |
| Cell type | 3T3 |
| Staining | Green: Acti-Stain™ 488 Fluorescent Phalloidin (Cytoskeleton Inc., PHDG1) applied at 100 nM for 30 min at RT. Blue: Hoechst 33342 (Molecular Probes, H-3570) was applied 1/1000 for 5 min after phalloidin staining. |
Figure 8 (above): Image rotation for study of cell shape. Phalloidin staining of filamentous actin in 6 days old 3T3 cell grown on Alvetex Scaffold. Whole cultures were fixed in PFA and processed for immunofluorescent confocal microscopy without sectioning. Side view was generated using the projection tool avail-able from Zeiss LSM browser software. Scale bars: 10 μm. Note that Alvetex Scaffold does not autofluoresce.
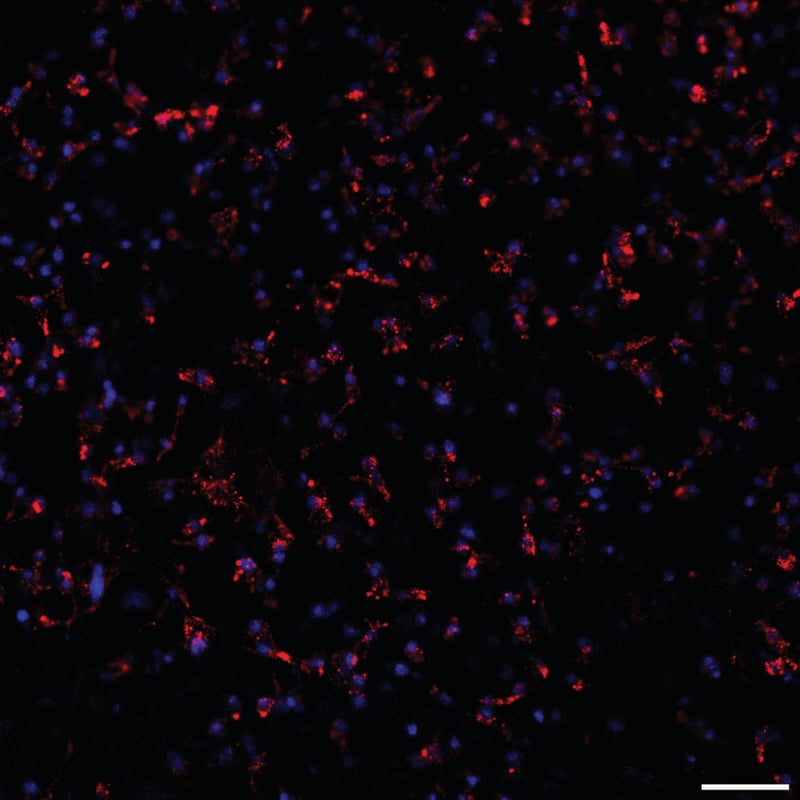
| Microscope | Zeiss 510 META |
| Objective | Plan-NeoFluor 10×/0.3 |
| Wavelengths | 405 nm, 543 nm |
| Filters | BP 420-480, BP 505-550 |
| Stack size | 460.7 Nm x 460.7 Nm |
| Cell type | CHO-K1 |
| Staining | Red: CellTracker™ CM-Dil (Invitrogen, Catalogue No: C-7000) applied 1 in 1000 of a 2 mg/mL stock solution for 5 minutes at RT to cells in suspension before seeding onto Alvatex Scaffold. Blue: Hoechst 33342 (Molecular Probes, H-3570) was applied 1/1000 overnight the day before imaging. |
Figure 9 (above): Confocal fluorescent live cell imaging. DiI staining of intracellular vesicles in 5 days old CHO-K1 cells grown on Alvetex Scaffold. Cells were stained with CM-DiI prior to seeding onto Alvetex Scaffold and vesicles were tracked by live cell imaging using confocal microscopy (a still picture is shown). Scale bar: 50 μm. Note that Alvetex Scaffold does not autofluoresce.
| Microscope | Zeiss 510 META |
| Objective | Plan-NeoFluor 10×/0.3 |
| Wavelengths | 405 nm, 488 nm |
| Filters | BP 420-480, BP 505-550 |
| Stack size | Top: 921.4 Nm × 921.4 Nm × 12.0 Nm Bottom: 921.4 Nm × 921.4 Nm x 9.0 Nm |
| Cell type | HaCat |
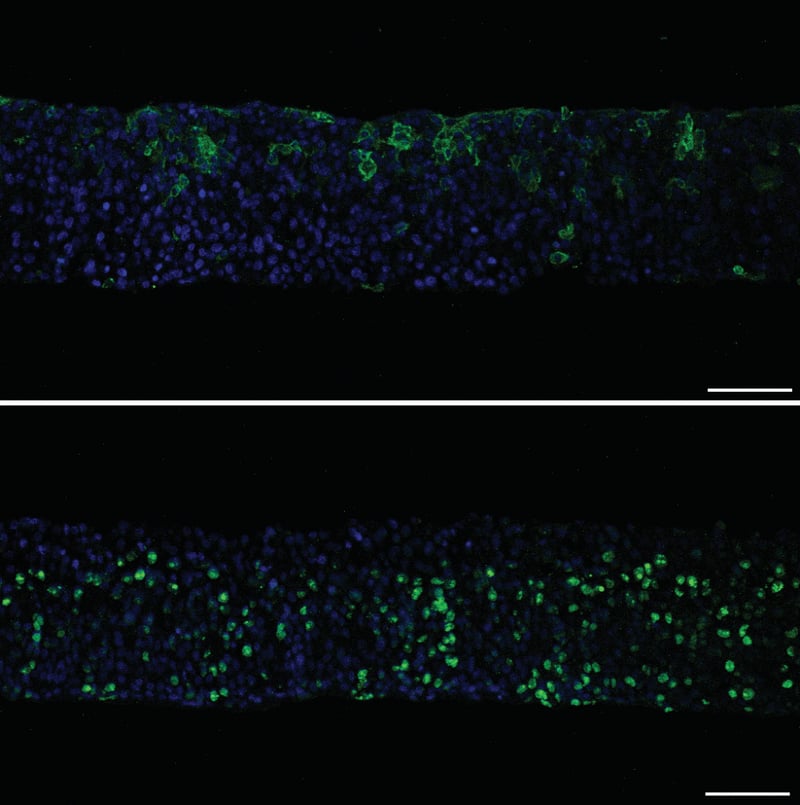
| Staining | Green: Primary antibody: Top: cytokeratin 10, clone DE-110 (Abcam, ab 9026) applies 1 in 100 overnight at 4°C. Bottom: rabbit anti-Ki67 (Abcam, ab 15580) applied 1 in 200 overnight at 4°C. Secondary antibodies: AlexaFluor 488 goat anti-mouse (top) or donkey anti-rabbit (bottom) IgG (Invitrogen) applied 1 in 600 dilution for one hour at RT. Blue: Hoechst 33342 (Molecular Probes, H-3570) was applied 1 /1000 at the same time as the secondary antibodies. |
Figure 10 (above): Immunofluorescence staining of wax-embedded sections. Cytokeratin 10 (top) and Ki67 (bottom) staining of HaCaT cells grown on Alvetex Scaffold at the air-liquid inter-face for 14 days. Whole cultures were fixed in PFA, wax-embedded, sectioned and antigen-retrieved prior to staining. Scale bars: 100 μm.