1. Introduction
Immunofluorescence uses the recognition of cellular targets by fluorescent dyes or antigen- specific antibodies coupled to fluorophores. Depending on the antibody or dye used, proteins, lipids and DNA can be visualised within individual cells and tissues. For 2D cell cultures, 3D cell culture sections or tissue sections, conventional microscopy is generally sufficient to visualise samples processed by immunofluorescence. For thicker specimens or when sectioning is not desired, confocal microscopy is to be preferred. Confocal microscopy relies on the combination of point illumination and a pinhole to eliminate most of the out-of-focus light signal and allows for reconstruction of 3D volumes, making it ideal to image cultures grown in full-thickness Alvetex Scaffold.
Below is an example protocol. It is recommended that for each antibody or dye used, the original manufacturers’ instructions for fixing, blocking and incubating methods be followed. Imaging of the specimens will also need to be optimised according to the specifications of the confocal microscope used.
2. Method
- If using the Alvetex Scaffold 12 well plate format (22 mm disc (AVP002)), gently remove the clip and lift the 3D culture using flat-ended metal forceps. If using well inserts (22 mm disc (AVP004), or 15 mm disc (AVP005)) unclip the base of the insert to release the 3D culture.
- Place each 3D culture into a fresh well.
Note: To improve the efficiency of the subsequent washing, fixing and blocking steps of this protocol, each 3D culture should be homogenously exposed to a suitably large volume of solution. Therefore it is recommended that at this stage 3D cultures grown on 22 mm discs be placed into 6 well plates and 3D cultures grown on 15 mm discs be placed into 12 well plates. The plates maybe gently rocked to facilitate diffusion.
- Wash the 3D culture in PBS, carefully aspirate and repeat the PBS wash twice.
Note: Thorough washing of 3D cultures requires an excess volume of PBS. Therefore it is recommended to use at least 5 mL of solution for 3D cultures placed into 6 well plates and at least 3 mL of solution for 3D cultures placed into 12 well plates for each washing step.
- Fix the 3D culture using either a fresh 4% paraformaldehyde solution (in PBS) for 10 min at room temperature or an ice-cold methanol/acetone (1:1 v/v) solution for 20 min in the fridge.
Note: The choice of the fixative solution should be in accordance with the manufacturer’s instructions for the antibodies used. As above, use excess volume of fixing solution. Use a glass vessel if fixing with methanol/ acetone mixture.
-
If using paraformaldehyde, an additional permeabilisation step is required. At the end of the fixation period, wash the 3D culture three times in a wash solution containing 0.02% (w/v) bovine serum albumin (BSA) in PBS, and then permeabilise cells with 1% (w/v) Triton-X100 in PBS for 15 min at room temperature. As above, use excess volume of both permeabilisation and washing solutions.
Note: If using methanol/acetone fixation, no permeabilisation step is required.
- Wash the 3D culture three times in the PBS/BSA wash solution. As above, use excess volume of washing solution.
- Block the 3D culture using a freshly prepared blocking solution consisting of PBS supplemented with 5% (v/v) normal goat serum (NGS), 1% (w/v) BSA and 0.2% (w/v) Triton- X100 for 15 min at room temperature. This blocking step will decrease non-specific binding of the antibodies used in the later steps of this protocol. As above, use excess volume of blocking solution.
- While the 3D culture is in blocking solution, dilute the primary antibodies or dyes in the PBS/BSA wash solution at the working concentrations recommended by their manufacturers.
Note: The volume of antibody solution required for each 3D culture will vary with the format of Alvetex Scaffold used. If using 3D cultures grown on 22 mm discs, a minimum of 150 μL of primary antibody solution per full 3D culture will be required whereas for 15 mm discs use at least 75 μL. In order to reduce antibody solution volumes, the 3D culture can be reduced in size by cutting the Alvetex Scaffold disc into pieces (e.g. quarters).
- Place the 3D culture facing upwards so as to maintain orientation, onto a dry slide. Using a PAP or DAKO pen, draw a desired area around your tissue section. This allows the applied solution to be localised on Alvetex Scaffold throughout the application time period.
Note: If the antibody is already conjugated to a fluorophore or a fluorescent dye is used, also protect from light.
- Pipette the primary antibody solution onto the 3D culture on the slide in side a humidified chamber.
- Leave the 3D culture in the primary antibody solution for the desired time at the required temperature. This is usually 1-2 hours at room temperature or overnight at 2-8 °C. In the meantime, dilute the secondary antibodies or dyes in the PBS/BSA wash solution at the working concentrations as recommended by the manufacturer.
- At the end of the primary antibody incubation period, return the 3D culture facing upwards to a new plate and wash the 3D culture three times in the PBS/BSA wash solution. (see 2.3 for volumes required).
- Place the 3D culture facing upwards on to a new, dry glass slide. Circle with a PAP or DAKO pen as previously (step 9).
- Pipette the secondary antibody solution onto the 3D culture inside a humidified chamber. Protect from light and leave for 1h at room temperature (or as required by the manufacturers’ instructions). In the meantime, label microscope slides.
- At the end of the secondary antibody incubation period, return the 3D culture facing upwards to a new plate and wash the 3D culture three times in the PBS/BSA washing solution (see step 2.).
- Put a drop of mounting medium on a microscope slide. One drop will be required for each 3D culture.
- Place the 3D culture facing upwards on the microscope slide and add one further drop of mounting medium on top of the 3D culture. Cover the 3D culture with a coverglass while taking care not to create air bubbles, then seal with nail varnish or tape. If using nail varnish, leave to dry for 10-30 min at room temperature.
- The sample is now ready for imaging by microscopy. If imaging is to be done at a later date, store the prepared microscope slides in the dark at 40 °C.
3. Special Considerations for the Imaging of Cell Cultures Grown in Alvetex Scaffold by Confocal Microscopy
The material used to manufacture Alvetex Scaffold will produce minimal autofluorescence and should not result in background signal when using confocal microscopy. Efficient washing and blocking steps will prevent any significant binding of secondary antibodies to Alvetex Scaffold. However, lipophilic dyes, such as Nile Red (see below), will bind strongly to Alvetex Scaffold. This feature can be used to conveniently visualise the scaffold within the cell culture.
Alvetex Scaffold discs are supplied at a thickness of 200 μm, which might exceed the Z-stack capacity of some models of confocal microscopes. The exact depth of sample that can be successfully imaged will vary according to the density of the cell culture and the fluorophore used, so that depths of more than 100 μm can be imaged from a cell-free Alvetex Scaffold disc, while depths of between 50 and 100 μm can be expected from a cell-seeded Alvetex Scaffold disc. As high-density cell cultures grown in Alvetex Scaffold approximate the complexity and structure of in vivo tissues, fluorophores specifically developed for in vivo deep imaging can be used to improve performance if needed.
4. Example images
4.1. Alvetex Scaffold stained with Nile Red
A working solution was prepared by diluting stock solution of Nile Red (Sigma, N3013) 1 in 1000. The stock solution was initially made up in methanol at 1 mg/mL, kept in a fridge and protected from light. Alvetex Scaffold was incubated 10 minutes at room temperature with the working solution in the dark, washed three times in PBS and mounted.
Note: Nile Red staining is best carried out after the secondary antibody stage following the PBS wash. Adhere strictly to incubation times and concentrations as higher concentrations of the working solution will produce strong staining in the red channel and a signal in the green channel.
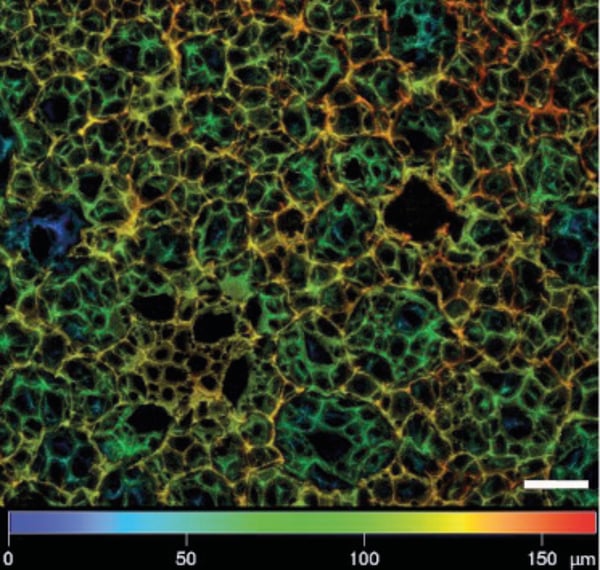
Figure 1. Depth colour-coded Z stack of cell-free Alvetex Scaffold stained with Nile Red. Picture taken on a Zeiss LSM 510 confocal microscope. Note the depth of the Z-stack exceeds 150 µm. Scale bar 50 µm.
4.2. Triple staining of HepG2 cells grown in 3D on Alvetex Scaffold
HepG2 cells were cultured for 3 days in Alvetex Scaffold 12 well plate format and stained as described above:
- Primary antibody: mouse anti-cytokeratin 8, clone M20 (Sigma, C5301) applied 1 in 200 dilution for one hour at RT.
- Secondary antibody: goat anti-mouse IgG (Invitrogen (Thermo Fisher), A11001) applied 1 in 600 dilution for one hour at RT.
- Nuclear counterstain: Hoechst 33342 (Molecular Probes (Thermo Fisher), H-3570) was applied at the same time as the secondary antibody.
- Nile Red: applied 1 in 1000 of a 1mg/mL working solution for 10 minutes at RT after the secondary antibody.

Figure 2. HepG2 cells grown for 3 days in Alvetex Scaffold 12 well plate format (AVP002). Cells were stained with Hoechst 33342 (blue), cytokeratin 8 (green) and Nile Red (red). Pictures were taken on a Zeiss LSM 510 confocal microscope. Note the background signal from Alvetex Scaffold in the blue and green channels is very low. Scale bar 10 µm.